Self-Hosted Blog Part 8 - Internet Accessibility
In part 7 we walked through how to get our blog running in Kubernetes. My Kubernetes cluster is sitting on my home internet connection. We need a way of getting from somewhere on the Internet into our Kubernetes cluster.
I have a Linux VPS that has been hosting my static site for a while. I’ve gained some experience with Tailscale at work. I first heard about it on Twitter, and we use it at work and it’s simply amazing. With Tailscale, it’s like putting the your machines on the same LAN even though they’re separated by many networks in between. I guess I’d categorize it as an overlay network.
I ended up building a network topology that looked like this:
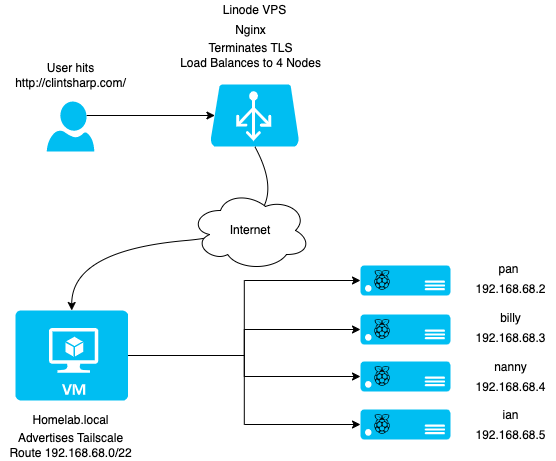
On my Linode VPS, I’ve setup nginx to serve as a reverse proxy and load balancer. I followed standard instructions for Ubuntu, basically sudo apt install nginx. I edited /etc/nginx/conf.d/default.conf to enable my site with the following configuration:
upstream blog {
  server 192.168.68.2:80;
  server 192.168.68.3:80;
  server 192.168.68.4:80;
  server 192.168.68.5:80;
}

log_format main_json escape=json '{'
  '"msec": "$msec", ' # request unixtime in seconds with a milliseconds resolution
  '"connection": "$connection", ' # connection serial number
  '"connection_requests": "$connection_requests", ' # number of requests made in connection
  '"pid": "$pid", ' # process pid
  '"request_id": "$request_id", ' # the unique request id
  '"request_length": "$request_length", ' # request length (including headers and body)
  '"remote_addr": "$remote_addr", ' # client IP
  '"remote_user": "$remote_user", ' # client HTTP username
  '"remote_port": "$remote_port", ' # client port
  '"time_local": "$time_local", '
  '"time_iso8601": "$time_iso8601", ' # local time in the ISO 8601 standard format
  '"request": "$request", ' # full path no arguments if the request
  '"request_uri": "$request_uri", ' # full path and arguments if the request
  '"args": "$args", ' # args
  '"status": "$status", ' # response status code
  '"body_bytes_sent": "$body_bytes_sent", ' # the number of body bytes exclude headers sent to a client
  '"bytes_sent": "$bytes_sent", ' # the number of bytes sent to a client
  '"http_referer": "$http_referer", ' # HTTP referer
  '"http_user_agent": "$http_user_agent", ' # user agent
  '"http_x_forwarded_for": "$http_x_forwarded_for", ' # http_x_forwarded_for
  '"http_host": "$http_host", ' # the request Host: header
  '"server_name": "$server_name", ' # the name of the vhost serving the request
  '"request_time": "$request_time", ' # request processing time in seconds with msec resolution
  '"upstream": "$upstream_addr", ' # upstream backend server for proxied requests
  '"upstream_connect_time": "$upstream_connect_time", ' # upstream handshake time incl. TLS
  '"upstream_header_time": "$upstream_header_time", ' # time spent receiving upstream headers
  '"upstream_response_time": "$upstream_response_time", ' # time spend receiving upstream body
  '"upstream_response_length": "$upstream_response_length", ' # upstream response length
  '"upstream_cache_status": "$upstream_cache_status", ' # cache HIT/MISS where applicable
  '"ssl_protocol": "$ssl_protocol", ' # TLS protocol
  '"ssl_cipher": "$ssl_cipher", ' # TLS cipher
  '"scheme": "$scheme", ' # http or https
  '"request_method": "$request_method", ' # request method
  '"server_protocol": "$server_protocol", ' # request protocol, like HTTP/1.1 or HTTP/2.0
  '"pipe": "$pipe", ' # “p” if request was pipelined, “.” otherwise
  '"gzip_ratio": "$gzip_ratio", '
  '"http_cf_ray": "$http_cf_ray"'
'}';

server {
  server_name  clintsharp.com;

  access_log  /var/log/nginx/clintsharp.com.access.log main_json;
  error_log  /var/log/nginx/clintsharp.com.error.log;

  location / {
    proxy_pass http://blog/;
    proxy_set_header Host            clintsharp.com;
    proxy_set_header X-Forwarded-For $remote_addr;
    proxy_set_header X-Real-IP $remote_addr;
    proxy_set_header X-Forwarded-Proto $scheme;
  }
}
Lastly, from this default config, I also setup Letsencrypt to enable TLS. It’s pretty simple:
sudo apt update
sudo apt install certbot python3-certbot-nginx
sudo certbot --nginx -d clintsharp.com -d www.clintsharp.com
Certbot will prompt you for some information, like your email address, and I configured it to modify the nginx configs automatically which it did just fine.
A user hits my Linode VPS, which proxies the connection with the above configuration to one of my backend k8s nodes. The 192.168.68.2-5 IPs are advertised in Tailscale by a VM I’m running on my NAS. I use Tailscale on another VM I’m already running and advertise the 192.168.68.0/22 network which is my home network. Then, the Linux VPS Tailscale client gets that route and knows how to talk to anything on my home LAN.
Rather than replicate their document, I’ll point you to installing Tailscale on Linux and setting up subnet routes to complete the setup I did. I merely followed their documentation and everything worked. It’s really quite amazing.
Lastly, I needed to connect my CI/CD pipeline to my K8S cluster to know when a new version has been deployed. For that, I’m also using Tailscale. Tailscale has a feature called ephemeral nodes which allows for things like CI/CD pipelines to get access to the local network. Follow their directions for setting it up in Tailscale. On my GitHub Actions workflow, I added the following steps YAML:
      - name: Setup Tailscale
        id: tailscale
        uses: tailscale/tailscale-deploy-github@main
        with:
          authkey: ${{ secrets.TAILSCALE_AUTHKEY }}
          version: 1.20.2

      - name: Deploy Blog
        uses: actions-hub/kubectl@master
        env:
          KUBE_CONFIG: ${{ secrets.KUBE_CONFIG }}
        with:
          args: rollout -n blog restart deployment/blog
The deploy step uses kubeconfig as a GitHub Actions Secret obtained from microk8s config. Now, on every push, my blog gets told to update the deployment to the latest image tag. Last step, we’ll do some performance testing
Posts in this Series
- Self-Hosted Blog Part 1 - Overview
- Self-Hosted Blog Part 2 - The Hardware
- Self-Hosted Blog Part 3 - OS & Kubernetes
- Self-Hosted Blog Part 4 - The Blog
- Self-Hosted Blog Part 5 - Container
- Self-Hosted Blog Part 6 - Build
- Self-Hosted Blog Part 7 - Kubernetes
- Self-Hosted Blog Part 8 - Internet Accessibility
- Self-Hosted Blog Part 9 - Performance